PM2012 World Congress: Automotive transmission gears – Enhancing design for the PM process
Tooth root optimisation of Powder Metal gears – reducing stress from bending and transient loads
A paper presented by Anders Flodin and Michael Andersson (Höganäs AB) examined the concept of redesign of the tooth root geometry of PM gears to reduce bending stresses.
In conventional gear cutting using a hob, there are significant restrictions on the range of tooth root radii that can be generated with the root being a function of the trochoid movements of the hub flutes, gear rotation and the geometry of the tip of the hub.
PM manufacture, on the other hand, offers much greater freedom in designing tooth roots to reduce bending stresses.
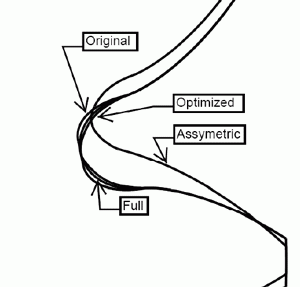
In this study, the following root geometries, as depicted in Fig. 1, were compared:
- Original 1.99mm (as given by a hob tip radius = 0.8 mm)
- Full radius
- Optimised curve shape.
- Asymmetric gear tooth
Finite element modelling has compared these root geometries in terms of peak stresses in the root (see Fig. 2 and Table 1).
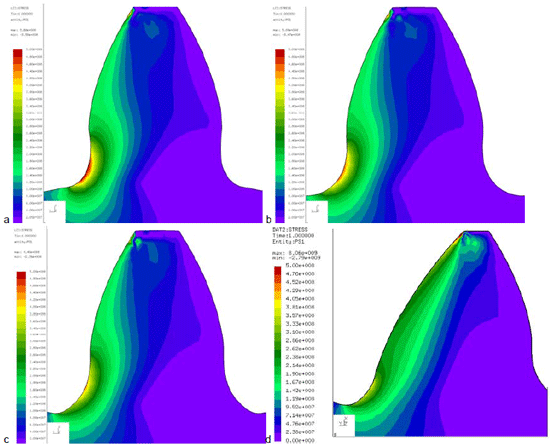
Fig. 2 Tooth root stresses, static analysis, a) original, b) max radius, c) optimized and d) asymmetric.
Note, same stress scale for all geometries [1]
It has been demonstrated that it is possible to reduce root stress in a gear tooth by replacing the cut trochoid root shape with a curve shape defined by a spline that is designed, iteratively, to reduce root stress. It is also possible to manufacture a gear with this root shape in mass production using PM manufacturing technology.
Where contact stress cannot be kept within the allowable stress levels, asymmetric gearing can also be introduced, with the challenge here being to balance stresses and NVH (noise, vibration and harshness) when driving on the coast side of the gear.
Automotive transmission design using full potential of Powder Metal
A second paper, by Anders Flodin (Höganäs AB) and Peter Karlsson (Vicura AB), described a particularly ambitious programme, in which the design of a specific automotive transmission is being assessed in detail and the viability of incorporation of gears, manufactured by PM, in this transmission without sacrificing performance is being evaluated.
The transmission, chosen for this programme, was a 6-speed manual gearbox, used by GM in the Opel Insignia model, with a 4-cylinder turbocharged 2-litre engine delivering 220hp/320Nm, and in other GM vehicles.
The 1st, 2nd and reverse drive gears are machined directly into the shaft of the gearbox and therefore could not be considered as candidates for replacement by PM. All other gears in the transmission – the reverse idler, the 1st and 2nd driven gears and both drive and driven members for 3rd, 4th, 5th and 6th gear – were, however, evaluated as potential PM targets.
The methodology adopted in this programme began with a system analysis. This comprised disassembly of the gearbox, while recording pull-off forces for gears and bearings and measuring axial play in the system.
The housing was scanned and imported into FE software. Shafts and gears were measured, modelled and assembled into the housing.
An essential part of a system analysis is the bearing stiffness. The bearing representation in this system model was reduced to define the stiffness between two nodes, representing the inner ring and the outer ring, due to the fact that this bearing stiffness is strongly nonlinear and depends on both bearing design and load direction/magnitude.
Simplified modelling techniques, in order to save calculation time, were used for bolts, roller bearing contact between gears and shaft as well as gear to gear contacts in the system analysis where the focus is on deformation of housing, shafts and bearings.
The output from the system analysis was gear misalignment and transmission deflections, which were used as input to the gear analysis where the micro geometry was adjusted to provide the best working behaviour of the gears, considering the misalignment and bending from shafts and bearings.
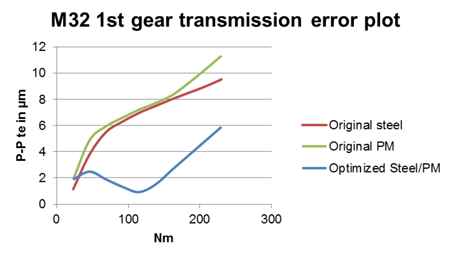
The influence of these micro geometry adjustments on peak to peak transmissions error (TE), a parameter that describes the quality of the mesh cycle of two gear flanks, is shown in Fig. 3. It is desirable to keep TE as low as possible. The green curve is for the “copied” PM gear with the steel flank design. This curve is higher than the original machined steel gear (red curve) for all torques, because of the lower stiffness of the PM material compared with the solid steel. The result from the design iterations to improve TE for the “optimised” PM gear is shown in the blue curve, where TE is lower for every torque level and is likely to perform significantly better than the PM gear with the copied design.
A “typical European consumer usage” duty cycle was used to evaluate gear life.
Misalignment data was taken from the system analysis and was accounted for in the micro geometry of the tooth flanks. Abuse load was 6500Nm on the differential cage, based on measured vehicle data.
The working behaviour of the gears in the system were modelled for 50%, 100%, 150% and 200% load and a range of temperatures, in order to assure the functionality under different conditions.
Initially, all PM gears were modelled as being sintered and case hardened Astaloy85Mo products at a density level of 7.25 g/cm3, using the material data shown in Table 2.
For this particular transmission, it has been demonstrated that the reverse idler gear and the 3rd and 4th gear pairs can be made with the shortest possible manufacturing route that gives 7.25 g/cm3 density.
For the 5th and 6th gear pairs, it was identified that a double press/double sinter process to increase density to 7.4 g/cm3 or the application of post-sintering operations, such as shot peening or super-finishing, would be necessary to increase performance.
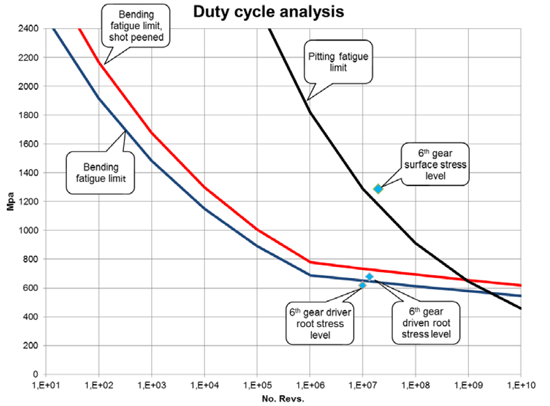
Fig. 4 Loads on 6th gear pair with correlating S-n curves for case hardened Astaloy85Mo PM gears with ISO 7 or better tolerances [2]
The durability of the 6th gear pair, manufactured using Astaloy85Mo at 7.25 g/cm3, is presented in Fig. 4. It can be seen from this figure that tooth root bending fatigue was within acceptable limits but that contact stress on the gear flank was a little too high. These gears, therefore, would require an increase in performance to qualify; hence, the need for the processing variants proposed above.
The first and second driven gears would need either the application of surface densification or more radical redesign.
The gear redesign in the GM transmission has taken both micro- and macro-geometry into account in order to reduce weight and inertia. Table 3 summarises the weight and inertia reduction benefits achievable for the driven gears in the transmission using “copied PM” and “optimised PM” concepts. Optimised redesign can remove 1.1 kg of mass.
The next step in this on-going initiative will be to redesign the first and second gear pairs using the more advanced design philosophies such as non-involute gearing and asymmetric gear teeth to be able to prototype the gear box without using any performance enhancing technologies such as Hot Isostatic Pressing (HIP) or other densification technologies.
There are a few unknown factors when moving away from the traditional involute curve shape. It is quite possible to reduce the contact and bending stress, but the difficulty lies when the transmission error has to be kept low for both drive and coast sides in order to avoid noise problems. This will be modelled to achieve good mesh properties before gear manufacture.
A few transmissions will then be built according to the optimised design but employing different PM technologies and will be installed in a car for everyday driving as a proof of concept. The transmissions will also be put into test rigs to test durability, noise and efficiency according to specified drive cycles.
Figure references
[1] From paper: ‘Tooth root optimization of Powder Metal gears – Reducing stress from bending and transient loads’, Dr. Anders Flodin, Dr. Michael Andersson, Höganäs AB, Sweden. Presented at the PM2012 World PM Congress, Yokohama, October 15-18.
[2] From paper: “Automotive transmission design using full potential of powder metal”, Dr. Anders Flodin, Höganäs AB, Sweden, Peter Karlsson, Vicura AB, Sweden. Presented at the PM2012 World PM Congress, Yokohama, October 15-18.
PM2012 World Congress Proceedings
Papers presented at the PM2012 World Congress will be published by the JPMA/JSP&PM in the Congress Proceedings, available in early 2013. Further information will be posted on the conference website.
News | Articles | Market reviews | Search directory | Subscribe to e-newsletter


