Euro PM2012: Materials characterisation of hardmetals for rock drilling applications
Rock drilling is essential for modern society in the mining and construction drilling industries, for example in ore and mineral mining, infrastructure projects and oil and gas drilling. Rock drilling can be performed by different drilling techniques, with the most common drilling technique applied in hard rock applications being percussive drilling. In this, the drill crown (bit) rotates and percussively impacts into the rock, the rock is crushed in the impacts and the bit is rotated to a new position before the next impact. The bit is equipped with buttons of WC-Co cemented carbide and, depending on the application, different button geometries and cemented carbide grades are used to optimise drilling performance.
Wear of the cemented carbide buttons is normally one of the lifetime-limiting factors for rock drill bits. To increase the lifetime of the buttons in rock drilling it is essential to investigate and understand the active wear mechanisms. Investigation of worn cemented carbide buttons from rock drilling includes not only the characterisation of the worn surface but also characterisation of the affected sub-surface layer in cross-section. Laboratory testing and modeling of wear is essential to develop better mining tools for improved performance, as is an understanding of the fracture toughness of hardmetals.
On the understanding of Cemented Carbide degradation in rock drilling: The importance of metallographic sample preparation
Stefan Olovsjö, Richard Johanson (Atlas Copco Secoroc AB, Sweden), Ulf Bexell, Mikael Olsson (Dalarna University, Sweden)
The research group from Atlas Copco clearly brought out the importance of specimen preparation for interpretation of wear evaluation of cemented carbides, not only on the wear surface but also in sub-surface layers. Fracture cross- sectioning of worn mining bits under tensile stresses is mandatory to reveal surface and subsurface degradation of the hardmetal structure. Fig. 1 shows the fracture surface of bits cross-sectioned and fractured in compression and tension. Compression cross sectioning induces additional severe damage.
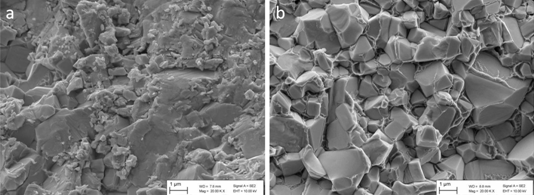
Fig. 1 SEM images of worn cemented carbide samples 1 and 2 fractured under a compressive (a) and a tensile (b) stress state, respectively. Note the severe damage of the fracture surface in a). (From paper by S. Olovsjö, et. al. ‘On The Understanding Of Cemented Carbide Degradation In Rock Drilling – The Importance Of Metallographic Sample Preparation’, presented at EuroPM2012, Basel, September 16-19, and published in the Conference Proceedings by EPMA)
Besides the sample preparation technique used, also the microscopy characterisation performed has a strong impact on the results achieved. The combination of high lateral resolution and high depth of focus makes scanning electron microscopy in combination with energy dispersive X-ray spectroscopy a powerful technique when it comes to characterising the degradation and wear mechanisms of the hardmetal drill buttons. However, to take full advantage of the possibilities of SEM the microscope settings should be optimised depending on the microstructural features to be studied. Setting parameters of interest are;
- Type of detector (SE-, BE-, SE/BE in-lens detector), which will affect the topographical/elemental information in the SEM image (see Fig. 2).
- Primary electron energy (acceleration voltage), which will affect the electron-surface material interaction depth and thus the depth of sight and resolution (see Fig. 3).
- Tilt angle, which will affect the topographical information (3D feeling) (Figs. 2 and 3).
- Working distance, which will affect the depth of field/resolution
- Aperture size, which will affect the depth of field/resolution
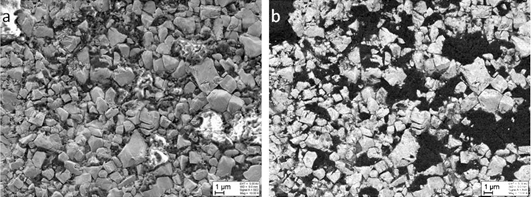
Fig. 2 Surface morphology of worn hardmetal drill button (untilted view). Exactly the same area is imaged using the SEI (a) and BEI detector (b), respectively. With the BEI detector areas with adhered rock material (dark due to a lower mean atomic number) are easily revealed. (From paper by S. Olovsjö, et. al. ‘On The Understanding Of Cemented Carbide Degradation In Rock Drilling – The Importance Of Metallographic Sample Preparation’, presented at EuroPM2012, Basel, September 16-19, and published in the Conference Proceedings by EPMA)
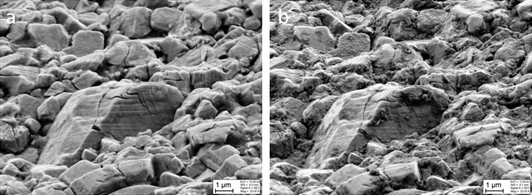
Fig. 3 Surface morphology of worn hardmetal drill button (70° tilted view). Exactly the same area is imaged using 10 keV (a) and 3 keV electrons (b), respectively (SEI mode). With the lower acceleration voltage it becomes clear that the WC grains are covered by thin layers of rock material. (From paper by S. Olovsjö, et. al. ‘On The Understanding Of Cemented Carbide Degradation In Rock Drilling – The Importance Of Metallographic Sample Preparation’, presented at EuroPM2012, Basel, September 16-19, and published in the Conference Proceedings by EPMA)
Test methods for high rate impact loading of hardmetals
H.G.Jones, K.P.Mingard, J.Zunega, M.G.Gee and B.Roebuck, National Physical Laboratory, UK
The paper presented by the NPL research group reports on the results of ongoing laboratory impact tests with two different loading mechanisms (electrodynamic and pneumatic) on a WC-6Co sample, relating the results to a microstructural investigation of the mechanisms of damage during testing. The electrodynamic jig generated a maximum test load between 550 and 600N with impact times of about 3 ms in a single 40 ms cycle. Tests upto 22 million cycles, both interrupted and uninterrupted using an impact target of hardmetal with a hardness of HV 2000 were performed. In the case of the pneumatic testing, the impact load was 2000 N for one and ten million cycles respectively at 50 Hz.
In the tests carried out so far, the carbide grains are fractured and crushed on the surface during impact and a layer forming where impact had taken place. EDX shows that this layer is oxygen rich and deficient in cobalt suggesting it is tungsten oxide. The oxide layer becomes fractured and in places lifts from the surface forming voids or further layers beneath it. Below the surface, there is some intergranular fracture between carbide grains and the cobalt binder but there is no significant fracture as observed by Beste et al. The two methods described so far show similar progression of the oxide formation, but the higher load pneumatic testing created a compacted impacted region in the middle of the crater.
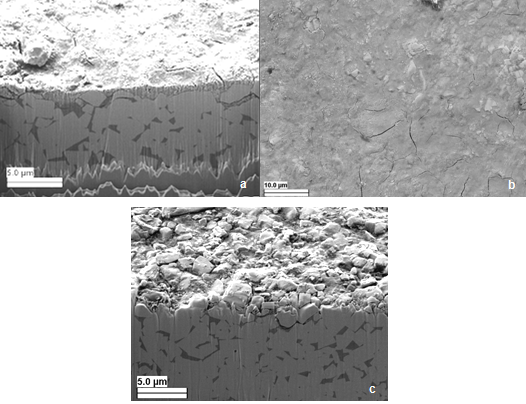
Fig. 4 SEM images taken at 5 kV of a) FIB section in the middle of the impact region, b) centre of impact region, and c) FIB section through edge of impact crater. (From paper by H.G.Jones, et. al. ‘Test Methods For High Rate Impact Loading Of Hardmetals’, presented at EuroPM2012, Basel, September 16-19, and published in the Conference Proceedings by EPMA)
Fig. 4 shows a sampling of the topography of the impact region after pneumatic testing, whereas the electrodynamic testing shows similar artefacts in the impact area.
Fracture toughness of rock bit cemented carbides
Y. Torres [1], , E. Tarrés [1,3], B. Roebuck [2], P. Chan [3], M. James [3], B. Liang [4], M. Tillman [3],R.K. Viswanadham [5], K. P. Mingard [2], A. Mestra [1] and L. Llanes [1]
[1] CIEFMA – Universitat Politècnica de Catalunya, Spain [2] NPL, UK [3] Sandvik Hard Materials, UK [4] Smith International Inc., USA [5] Sandvik Rotary Tools, USA
The aim of the research work presented by an international group of authors was to document and analyse fracture toughness and corresponding crack – microstructure interactions for mining and rock bit cemented carbides. The characteristics of the hardmetals studied are shown in Table 1.

Table 1 Microstructural and mechanical (hardness and toughness) characteristics for the materials investigated. (From paper by Y Torres, et. al. ‘Fracture toughness of rock bit cemented carbides’, presented at EuroPM2012, Basel, September 16-19, and published in the Conference Proceedings by EPMA)
Fracture toughness was determined using single edge notched bend (SENB) specimens of dimensions 10 x 5 x 45 mm, with a notch length–to–specimen width ratio, a/W, of 0.4. Notches were induced in the material by electrical discharge machining, followed by notch tip sharpening using a razor blade impregnated with diamond paste. The resulting notch tip curvature was between 10–20 µm. A pre-crack was introduced through application of cyclic compressive loads under reverse cyclic bending.
Stable crack growth was observed during cyclic compression, cracks becoming arrested after extension between 80 and 100 µm from the notch tip. Based on previous experience on residual stresses induced during pre-cracking, these pre-cracks were further propagated under far–field cyclic tensile loads. Crack extension behavior under constant applied load ranges was monitored in situ using a high resolution telescope.
Generated cracks were extremely fine and sharp, following transgranular paths through either the binder phase, although close to the carbide–binder interface, or the carbides. However, the coarse aspect of the microstructure points out the prevalence of a crack–microstructure interaction relatively uncommon in fine–carbide hardmetals, i.e. crack deflection (Fig. 5).
Such phenomenon may be described as pronounced in terms of both effective crack path perturbation and event occurrence frequency. Hence, it should be considered as another relevant toughening mechanism, besides the one associated with plastic stretching of ductile ligaments, for these hardmetal grades.
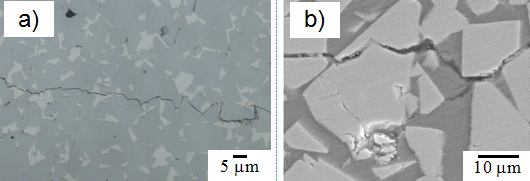
Fig 5. a) Optical micrograph showing the magnitude and frequency of crack deflection phenomena during stable crack propagation; b) SEM micrograph detailing crack deflection mechanisms, both within a coarse carbide and through the subsequent binder ligament, during stable crack propagation (From paper by Y Torres, et. al. ‘Fracture toughness of rock bit cemented carbides’, presented at EuroPM2012, Basel, September 16-19, and published in the Conference Proceedings by EPMA)
Finally, fracture toughness was determined by testing the pre-cracked SENB samples to failure under constant loading rate values, between 200 and 400 N/s. Stress intensity factors given in the literature were used in the fracture mechanics evaluation. Fracture toughness values for each hardmetal grade, determined from at least three tests per set, are included in Table 1.
Relevant differences are only observed for the hardmetal grade D, this material exhibiting the highest fracture toughness value. The fracture surfaces show, dimple ductile rupture in the metallic binder interdispersed with cleavage and intergranular fracture of the carbides as the relevant fractographic features discerned in all the cases (Fig. 6a). Particularly, crack–microstructure interactions involving large carbides mostly exhibited a transgranular character, as clearly discerned from the river pattern features observed on them (Fig. 6b).
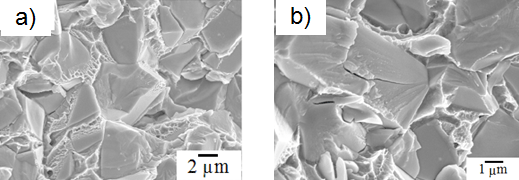
Fig. 6 a) SEM micrograph showing fractographic aspects associated with unstable failure in SENB specimens tested to rupture; b) SEM micrograph showing details on the transgranular fracture of carbide particles. (From paper by Y Torres, et. al. ‘Fracture toughness of rock bit cemented carbides’, presented at EuroPM2012, Basel, September 16-19, and published in the Conference Proceedings by EPMA)
The most relevant toughening mechanism for WC-Co is according to literature, crack shielding due to ductile Cobalt ligament bridging behind the crack tip. The effective saturation toughness may be estimated from literature:
where Kt is the critical crack-tip stress intensity factor required for crack initiation; E is the Young’s modulus and v is the Poisson’s ratio of the composite; σy is the binder flow strength determined from a Hall–Petch type relation (σy = σo + ky[λCo]-1/2, with σo ~ 480 MPa and ky = 7.7); Af is the area fraction (intersected by the crack plane) of the ductile binder; and C* is a “work of rupture” function that depends on constraint (and thus on the strength of the binder–carbide interface) and constitutive properties of the binder.
Based on the analysis of the experimental findings on fracture toughness assessment and analysis for four different rock bit cemented carbides, the authors draw the following conclusions:
- Rock bit cemented carbides exhibit relatively high fracture toughness values (between 17 and 20 MPa√m) in direct association with their specific microstructural characteristics, i.e. large carbide grain size and relatively high cobalt content.
- The influence of microstructure on the measured fracture toughness may be accounted by considering the complementary and effective operation of ductile ligament bridging and crack deflection as the prominent toughening mechanisms.
They do point out that additional results and analysis is necessary to strengthen their postulate that crack deflection was a operative toughening mechanism intrinsic to coarser carbides as well as from the expected higher effective ductility of the binder in the materials studied here.
The renewed interest in understanding the strengthening and wear mechanisms in rock drilling hardmetal applications will also facilitate the development of hardmetals in other applications.
News | Articles | Market reviews | Search directory | Subscribe to e-newsletter


