Examination of fracture and deformation mechanisms in WC/Co hardmetals
Dr David Whittaker reports exclusively for ipmd.net on the group’s development of a new test system for in-situ controlled crack growth experiments in a high resolution SEM.
The system is shown schematically in Fig. 1. The double cantilever beam fracture specimens are placed between an anvil and 90° wedge made from alumina. Load is applied to the alumina wedge using a piezoelectric displacement transducer capable of extending by a nominal 60μm and supporting a load of 4.5 kN. The anvil is supported by a piezoelectric load cell (connected to a Charge Amplifier) to measure the applied load and is in turn positioned against a large bolt that is used to pre-load the specimen.
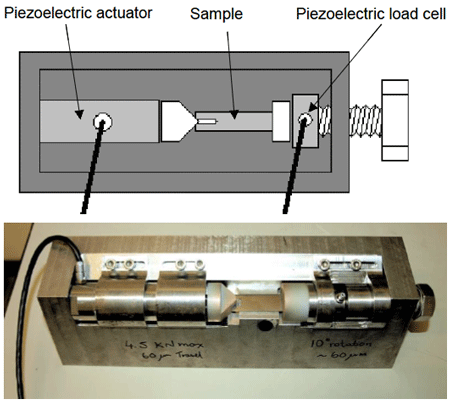
Fig. 1 In-situ test system schematic (top) and photograph (bottom) (From paper by M G Gee etal, ‘Examination of Fracture and Deformation Mechanisms in WC/Co Hardmetals’ presented at Euro PM2011 Conference. Published in the Conference Proceedings by EPMA, UK)
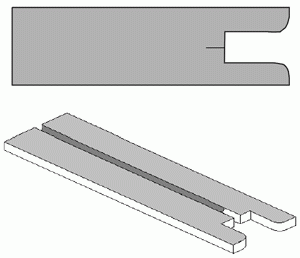
Fig. 2 Test specimen, a) view from top, b) underside of
sample showing groove (From paper by M G Gee etal,
‘Examination of Fracture and Deformation Mechanisms
in WC/Co Hardmetals’ presented at Euro PM2011
Conference. Published in the Conference Proceedings
by EPMA, UK)
In the experiments reported in this paper, 40mm x 12 mm x 1 mm thick samples (Fig. 2) were manufactured by EDM. The flat surfaces of the samples were both ground. The samples were then annealed in a vacuum furnace at 800°C for 30 minutes, and the top surface polished.
At one end of the sample a 5 mm wide throat was machined to accommodate the ceramic wedge. The part of the sample that contacted the ceramic wedge was rounded to ensure that there was a single point of contact and that the stress generated at this contact point was low enough to ensure that no damage occurred to the sample and wedge during an experiment. The back face of the sample was machined with a 0.5 mm deep groove to constrain crack growth to the centre line of the sample. A starter notch, 0.5 mm wide and 3 mm long, was EDM machined along the centre line of the sample.
When a crack initiates, depending on its size and speed, it may cause a drop in the compressive load, or a reduction in the rate of load increase. The developed control software is capable of using either of these conditions as triggers to halt the loading of the specimen so that the crack progression can be studied in detail under the SEM. In practice, it was found that using detection of reduced loading rate and keeping the excitation voltage constant gave the best results.
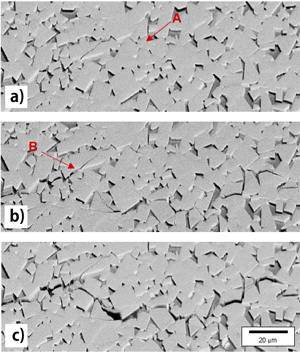
Fig. 3 Frames from video showing crack growing,
a) start of sequence, b) 0.8 seconds into crack growth,
c) 1.6 seconds into crack growth (From paper by M G
Gee etal, ‘Examination of Fracture and Deformation
Mechanisms in WC/Co Hardmetals’ presented at Euro
PM2011 Conference. Published in the Conference
Proceedings by EPMA, UK)
Tests were carried out on a range of WC/Co hardmetals with different grain sizes and binder phase contents.
An example of the results obtained is shown in Fig. 3. This figure shows a sequence of frames from a movie at the crack tip as the crack was grown by increasing the exciting voltage on the piezoelectric actuator. Fig. 3a shows the crack tip as it was seen after arresting the growth during a previous application of the load and immediately before the further growth seen in Figs. 3b and 3c. The controlled crack growth can be judged from the relatively slow rate of crack growth seen in this figure and the arrest of the crack on removal of load at the crack extension shown in Fig. 3c.
Characteristic features of the fracture process include the discontinuous crack growth with areas of the structure remaining bridging across the crack and the propagation of the next stage of the crack from a point further back from the crack tip (arrowed in Fig. 3b).
The results of Electron Back Scattered Diffraction (EBSD) analysis of areas around the crack tip are shown in Fig. 4 (in this case for WC only). In the Inverse Pole Figure (IPF) maps (Figs. 4a and 4c), only a few grains show a variation in shading or colour across a grain indicative of strain in the grain. This is even true for grains that have fractured, including a grain where a ligament of material remains connecting the two halves of the grain.
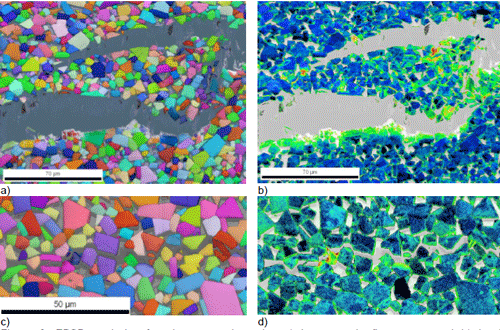
Fig. 4 EBSD analysis of regions around cracks – a) and c) are inverse pole figures maps, b) and d) are local misorientation maps (From paper by M G Gee etal, ‘Examination of Fracture and Deformation Mechanisms in WC/Co Hardmetals’ presented at Euro PM2011 Conference. Published in the Conference Proceedings by EPMA, UK)
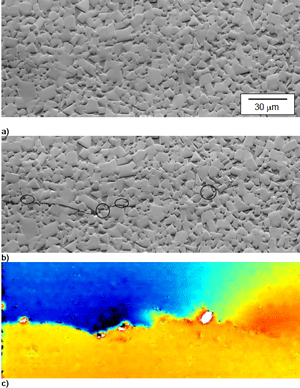
Fig. 5 Digital image correlation of crack region,
a) image before crack extension, b) image
after crack extension, c) map of y displacement
(perpendicular to crack) from correlation of images
in a) and b). Note that in c) the colour scale runs from
blue with a y displacement of -1.5 micron to red with a
y displacement of 0.5 micron.(From paper by M G
Gee etal, ‘Examination of Fracture and Deformation
Mechanisms in WC/Co Hardmetals’ presented at Euro
PM2011 Conference. Published in the Conference
Proceedings by EPMA, UK)
Digital image correlation techniques have also been applied to track the movement of specific points in the image relative to another position (Fig. 5). The overall displacement field can be seen where the surface below the crack has moved relative to the surface above the crack (blue and yellow colouration in the displacement map in Fig. 5c). The displacement field ahead of the crack tip can also be seen. Three small areas of very high displacement have been observed at the edge of the crack, but, at present, it is not clear how these relate to local microstructural features.
The group is continuing to refine this test system further. A current drawback with the system is that the loading across the notch that is causing the crack to grow is not well defined. A wedge loading system has been employed for reasons of space constraint, but friction at the contact point between the wedge and sample means that the crack opening load is lower than the load applied by the wedge.
To overcome this drawback, the test system is being extended by adding potential drop crack growth measurement and a clip gauge to measure the crack opening displacement. When the use of these techniques is combined with calculation of the compliance of the test specimen, the true load applied across the notch will be defined so that parameters such as the fracture toughness of materials tested can be measured and related to microstructural observations.
News | Articles | Market reviews | Search directory | Subscribe to e-newsletter


