Innovations in Powder Metallurgy at the PM2010 World Congress: Developments in Hard Materials
Fatigue testing of hardmetals re-invented
The European Hard Materials Group (EHMG), a special interest group within the European Powder Metallurgy Association (EPMA), is composed of the leading European manufacturing and research organisations in the hard materials sector.
The group has initiated a feasibility study for an innovative high cycle fatigue test of hard materials at a high frequency of 20 kHz. The results of this study were presented by Prof Herbert Danninger of the Technical University of Vienna, Austria, who had also been in charge of the research, at an Open Meeting of the EHMG in Florence, Italy.
Fatigue testing is a time consuming and costly task, and a high number of load cycles must be applied under alternating loading conditions to determine service life. It is easy to see that the frequency of alternating loading determines the time required to apply a certain number of load cycles. A high load frequency can, therefore, substantially reduce the time and costs of fatigue testing.
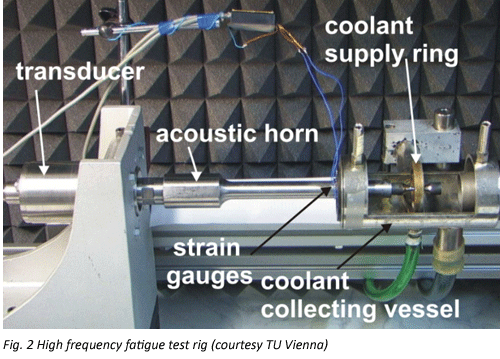
Fig. 1 shows a schematic of the test rig used. The alternating load was generated by an ultrasonic transducer, with an acoustic horn transferring the vibration to a coupling piece attached to the test specimen. The other end of the specimen was free. The loading mode in this test was tension-compression and a splash cooling unit was installed around the test specimen in order to prevent the sample from heating up. A photograph of the actual test rig is shown in Fig. 2.
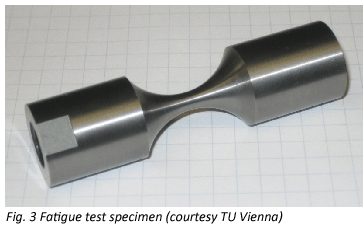
The aim of the feasibility study was to qualify the test for hard materials and define the geometry and preparation route of test specimens (Fig. 3). Of particular importance is the total length of the sample which must match with the test frequency in order to ensure optimum resonance. A total length of 24 mm was proposed with a test diameter at the thinnest point of 4 mm. Depending on the elastic modulus of the tested material the test frequency has to be fine tuned.
 The surface finish is also important as fatigue cracks tend to start at the surface. The surface must be free from residual stresses that might bias the results.
The application of high frequency fatigue testing at 20 kHz allowed, for the first time, to extend the number of load cycles into the gigacycle range (10 gigacycles = 10 billion cycles = 1010 cycles). The duration of the 10 gigacycle test was just a few days. At a frequency of 30 Hz, which is common in fatigue testing, it would have taken roughly 10 years.
The push-pull mode applied for loading was reported to put a significantly larger part of the sample volume under stress than the bending mode. Therefore it was assumed that the test should be more sensitive to material defects such as residual pores, cobalt pools or excessively large tungsten carbide grains.
An extensive research project is being planned at the Technical University of Vienna where the potential of the new fatigue test will be fully exploited.
Advanced technique to study the cobalt binder phase in hardmetals
Dr Jessica Marshall of Sandvik Hard Materials Research in Coventry, United Kingdom, investigated the binder phase in WC-Co hardmetals using electron backscatter diffraction (EBSD). This is a highly sophisticated metallographic technique which is performed in an electron microscope.
The preparation of test samples begins with grinding and polishing, as in optical metallography. Samples are diamond polished to 0.25 µm prior to 5 minutes 0.05 µm colloidal silica polish, then ion-beam etched for 90 minutes in an argon atmosphere. Finally, samples are etched using Murakami’s reagent.
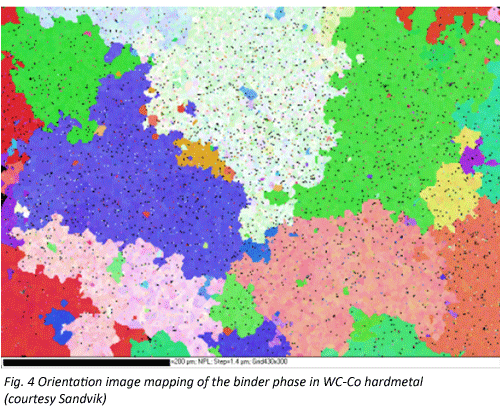
Samples were mounted in a custom-built holder tilted at 70° to the horizontal, eliminating the need for adhesive. The orientation image mapping technique that was applied reduced the tungsten carbide grains to small grey regions and made the binder phase orientation visible. An example is shown in Fig. 4.
The colours in this image represent the orientations of cobalt grains, with each grain depicted by one colour. The size of the cobalt grain was often 300 microns or more whereas the average grain size of tungsten carbide was only 3 microns. The boundaries between cobalt grains often appeared interlocked, which is unusual for metallic microstructures. The author argued that true Co-Co grain boundaries are much less in hardmetal than WC-Co grain boundaries, as WC-Co hard metals consist of a dispersed tungsten carbide phase surrounded by metallic cobalt.
News | Articles | Market reviews | Search directory | Subscribe to e-newsletter


