The Impact of Sintering on Microstructure and Hardness
![]() Download original article as a PDF
Download original article as a PDF
The following feature describes the process of manufacturing PM parts as applied in the Metal Forming Institute, Poznan, Poland, in conjunction with Seco/Warwick SA. The authors compare the effect of different sintering methods on the microstructure and hardness of three sample parts.
 Rapid developments in applications for PM force intensive demands on both new materials and innovative technologies. In recent years, there has been a noticeable acceleration of developments in PM thanks to both automotive and aviation industry growth. According to the authors of this article, around 70% of the world PM products are consumed by the automotive industry.
Importantly, the major advantage of new technologies incorporating PM products is the ability of the process to adjust the chemical composition of powders and furthermore possibility to tailor the physical, mechanical and operational features of final products and semi-finished products
Such processes enable serial and mass production of sophisticated shape products maintaining high dimensional accuracy, often with no additional machining required. Due to cost reduction direction demands, the important benefits of such technologies are low energy consumption per unit and almost complete use of materials.
Test scope: samples preparation for tests
In the Metal Forming Institute in Poznan, Poland tests were undertaken on PM parts manufacturing by use of single-stage die pressing pressing. All samples for testing had been made of powder mix prepared by Metal Forming Institute on the base of Astaloy Mo powder made by Höganas AB, Sweden.
The parts were formed following the typical die compaction process. The green compacts were then initially sintered with to consolidate the compact and to remove lubricant agent. The samples prepared in this way were then finally sintered.
The aim of tests was to identify the influence of the final sintering methods on the structure and properties of samples. One batch of samples was sintered in the traditional way in an endothermic atmosphere generated from natural gas in a tunnel furnace. The second group of samples was sintered in vacuum furnace VPT type made by Seco/Warwick, as can be seen in the advertisement on the opposite page.
The samples, prepared in this way, can be following vibrated or both heat treated and vibrated. Loose abrasive material treatment is applied for rounding the sharp edges of the samples and for removing some residue remaining after the sintering process. The purpose of thermal processing is to modify the surface layer of the samples.
Test Methodology
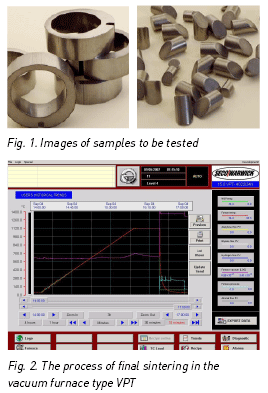
Three types of part were tested: taper key Φ5, taper key Φ7 and cam ring (Fig. 1). The samples were all pressed and preliminarily sintered under the same parameters. Further, the samples were divided into two batches. Batch I was final sintered in a tunnel furnace in endothermic atmosphere, whilst Batch II was sintered in vacuum furnace of the VPT type made by Seco/Warwick, working area dimensions: 400 x 400 x 600 mm.
This type of furnace is typically applied for thermo-chemical treatment (vacuum carburising), hardening processes, tempering, soldering as well as annealing. Owing to its universality, sintering processes also can be executed in this furnace, thanks to its graphite heating chamber enabling its heating up to 1350°C. Flat, wide heating elements ensure high temperature uniformity to be obtained during the heating up process. This feature improves additionally the sintering process results. The special circuit cooling system of neutral gas supports the load cooling down under control, enabling this way reduction and control of distortions of treated parts.
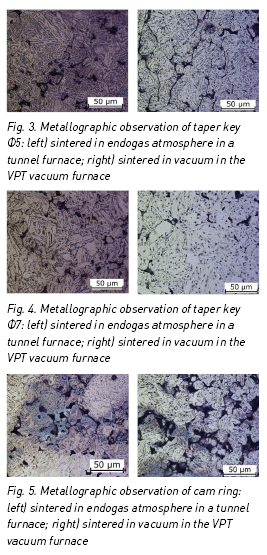
The sintering process takes only ca. 3,3 h thanks to the application of both an efficient pumping system as well as the modern control system of the VPT type furnace (Fig. 2).
After final sintering the parts were subjected to metallographic testing as well as testing for hardness according to HRA scale. The part dimensions were inspected at each stage.
 Test results
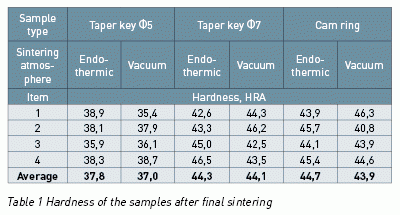
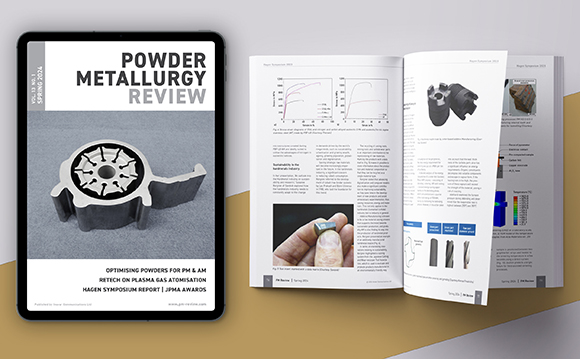
The samples: taper key Φ5, taper key Φ7 and cam ring made in accordance with technology as elaborated in the Institute were viewed under the Nikon Eclipse L150 luminous microscope. The chosen results are shown on the Figs. 3-5. The images for both types of final sintering were made in the same place of the cross section of samples. The samples were also tested for hardness by use of the Future Tech FR-3e hardness testing device according to HRA scale. The results are presented in Table 1.
Evaluation of the dimension cards proved, that the method of final sintering used does not affect the sample dimensions. In both cases, the results meet the requested dimensional tolerances.
Results estimation and final conclusions
The tests undertaken on the above parts proved the following:
- In both sintering variants the samples showed the same structure as well as comparable hardness.
- The method of sintering does not affect the dimensional accuracy of the samples produced. In each sample the required dimensional tolerances were maintained.
- For the samples tested, produced from a powder mix prepared in the Institute based on Astaloy Mo made by Höganas AB, the final sintering process either in endogas or in vacuum can be applied interchangeable.
 The scientific work has been executed within the framework of statute activity funded by Ministry of Science and Higher Education: NM 901 21 000 – Application of nanotechnology and nanoparticles for the production of low-friction ratio sintered elements.
Authors
M.A. Justyna WENDLAND, Ph. D. Jacek BOROWSKI, M.A. Walerian MAJCHRZAK, Metal Forming Institute, Poznan, Poland and M.A. Adam ADAMEK, SECO/WARWICK S.A., Świebodzin, Poland
For further information please visit www.secowarwick.com


