PM2014 World Congress: Predicting Powder Metallurgy gear tooth bending fatigue strength
Tooth bend fatigue is a significant potential failure mechanism in gears and needs to be assessed in gear design. Ideally, this assessment ought to be based on fatigue data generated directly on gears. However, such data is often not available, particularly for PM gears. There is, therefore, a strong need to able to transfer fatigue data, derived on test bars, to the design analysis of PM gears.
Michael Andersson, Hoganas AB, Sweden, reported on a study, which examined the comparative merits of four different model types, aimed at achieving this transfer and predicting tooth bend fatigue strength in gears.
The four models used to investigate the notch effect in PM materials were:-
- The critical distance method – the criterion in this method is that the effective stress at a distance dp from the peak stress in a notch should be smaller than the critical stress
- The gradient method – a similar approach to the critical distance method that introduces a support factor based on the relative stress gradient
- The highly stressed volume method – this uses a reference volume around the location of peak stress, within which the applied stress falls to no more than a reference level. The reference volume commonly adopted is V90, where the stresses in the volume are 90% or more of the peak stress
- A fracture mechanics method – this method is based on the observation that, for PM steels, fatigue cracks tend to initiate at the largest pore in the highly stressed volume. By treating crack growth initiation using a fracture mechanics approach, the size of the largest pore can be linked to the fatigue strength of the material. To obtain the size of the largest pore, an approach using extreme value statistics is adopted and the largest pore in a given volume is given by a Gumbel distribution. The parameters that define this distribution can be determined by metallographic investigation combined with image analysis
Further information on these methods can be found by reference to the full paper.
The experimental procedure, adopted in this study, comprised:-
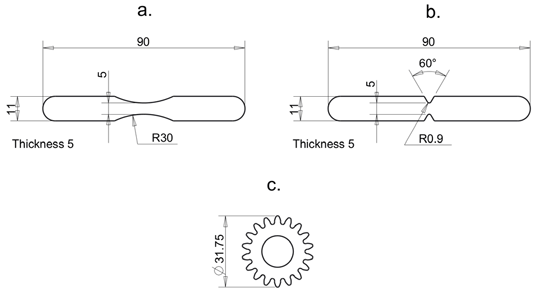
- The production of un-notched and notched fatigue test bars and gear samples (Fig. 1), from Hoganas’s Astaloy 85Mo (Fe + 0.85% Mo) + 0.65%C. All samples were through hardened and tempered after sintering
- Fatigue testing in plane bending of the un-notched and notched test bars at load ratios of R = -1 and R = 0. To be relevant to the load ratio used in the pulsator testing of gear teeth, the fatigue endurance limits generated in these test bars needed to be recalculated to R = 0.1. This was done through extrapolation in a Haigh diagram (Fig. 2)
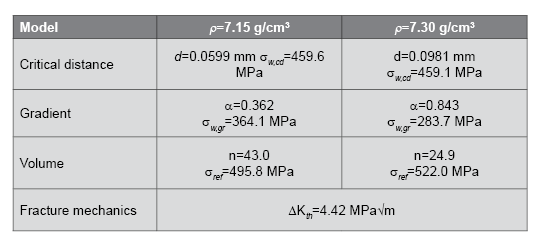
- Determination of the parameters for the fatigue models from the extrapolated results for R = 0.1. For critical distance, gradient and volume methods, there are two parameters and two data points per density level, allowing the parameters to be calculated. The fracture mechanics model only requires one parameter, which depends only on the structure and thus is density independent. This parameter is determined by a least squares fit of the four available data points. All the resulting parameters are presented in Table 1
- Finite element analysis of the gear, to determine the stress distribution around a gear tooth root arising from point loading on the tooth tip (Fig. 3)
- By inserting the parameters for the fatigue models, given in Table 1, into the different fatigue models and combining them with the stress analysis for the gears, the strength of the gears was estimated with the different models
- The fatigue testing of gears using a pulsator type tooth root bend test.
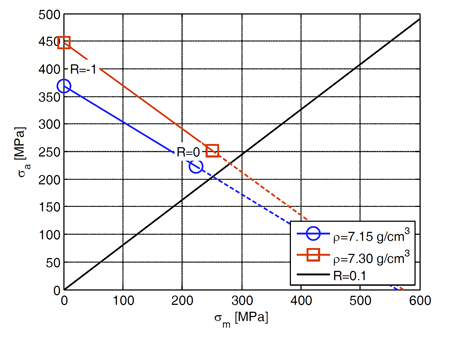
Fig. 2 – Haigh diagram, showing mean stress compensation, stress amplitude vs. mean stress and data for un-notched samples [1]
The capabilities of the different models were assessed by comparing the predicted strength levels with the experimentally determined values (Table 2).
From Table 2, it can be seen that the different models yield results with varying accuracy. Generally, the estimated strengths are reasonably close to the measured values, with a maximum deviation of 13%. However, some models yield significantly better predictions than others.
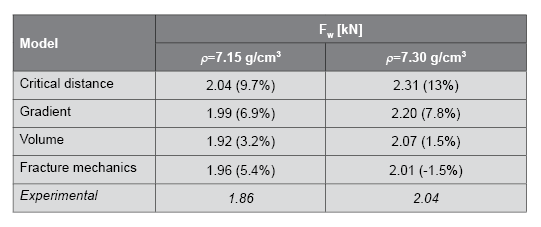
Table 2 Predicted gear strengths using the different models. Differences between predictions and the experimentally determined values are given in parentheses, in percentage terms [1]
The volume and fracture mechanics models showed the best accuracy in this study. Both of these models are based on the notion that the notch effect is related to the stressed volume of the component, i.e. a larger stressed volume samples more defects and thus has a lower strength.
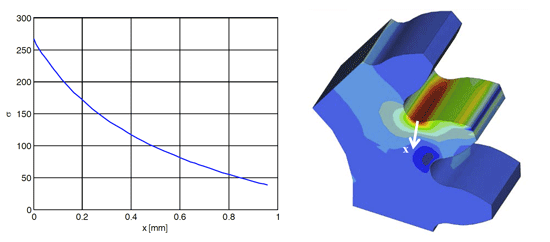
Fig. 3 Stress as a function of distance from the surface at the tooth root and the stress distribution, calculated for a unit load at the tooth tip [1]
Finally, models with a large number of parameters that need to be estimated will also require a large number of experiments. Thus, having a model with only a few parameters, but that is able to capture the relevant physical phenomena is a better choice and the fracture mechanics approach has particular attractions in this context.
The fracture mechanics model also requires an investigation of the pore structure, but such an investigation is quicker and easier than a full fatigue test. Also, the fracture mechanics approach includes the effect of density in the pore size investigation. For the other models, the effect of density needs to be included separately in the model, introducing further parameters.
References
[1] Michael Andersson, Predicting PM gear tooth root bending strength, as presented at PM2014 World Congress, MPIF, USA
Author
Dr David Whittaker is a consultant to the Powder Metallurgy and associated industries. Contact +44 1902 338498 email: [email protected]
PM2014 World Congress
The 2014 World Congress on Powder Metallurgy and Particulate Materials was organised by the Metal Powder Industries Federation. For more information please visit the MPIF website: www.mpif.org
margin-left: 0px;”>
Subscribe to our FREE e-newsletter
Register to receive our FREE e-newsletter and a complimentary digital subscription to Powder Metallurgy Review magazine:
Useful links: Download PM Review magazine | News headlines | Browse articles


