Innovations in Powder Metallurgy at the PM2010 World Congress: Non-destructive testing of structural PM parts
Quality control in powder metallurgy is a constant issue, with non-destructive testing playing an increasingly important role in this process. Several presentations at the PM2010 World Congress in Florence were devoted to this subject area and below we highlight two of them.
Fully automatic ultrasonic test system for sintered parts
The conclusion of a research project under the Seventh Framework Programme of the European Union FP7 was reported by Dr András Bulkai of MFKK Invention and Research Centre in Budapest, Hungary. An international consortium of non-destructive testing researchers, software specialists and powder metallurgists developed a fully automatic ultrasonic test for powder metal parts. The work relating to the development of ultrasonic transducers was carried out at the Universitat Politecnica de Catalunya (UPC).
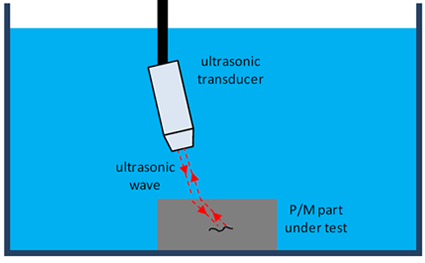
The principle of the test setup is shown in Fig. 1, where pulse echo ultrasound technology is applied. Sintered PM parts made from ferrous alloys were placed in a tank containing a medium capable of transmitting ultrasonic waves. An ultrasonic transducer head, mounted at the end of a robotic arm, was set at a certain angle over the parts and moved in such a pattern that the entire part was scanned.
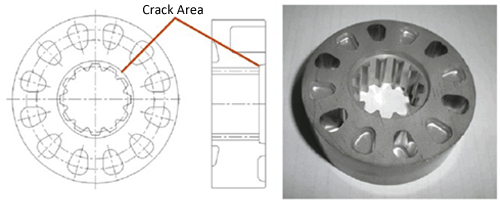
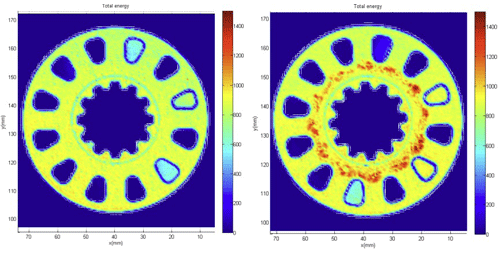
One of the tested parts is shown in Fig. 2, cracks can occur at the step indicated in the drawing. Horizontal scans, the so-called C scans, and vertical scans, so-called B scans, were taken with the system and images were computed on the basis of the acquired data. Fig. 3 shows images of C scans, the left image shows a defect-free part and the right a defective part.
Before the system can be introduced into industrial practise further improvements and tests are required, such as an increase of the speed of data acquisition, evaluation of the effect of the ultrasonic frequency and others.
The research leading to these results has received funding from the European Community’s Seventh Framework Programme (FP7/2007-2013 under grant agreement n°222288).
Gamma ray densitometer detects large density gradients in powder metal compacts
The density distribution in a powder metal compact is usually very complex. Powder fill characteristics, frictional forces between the individual powder particles, friction with the die and core rod walls, as well as powder transfer movements inside the tooling all contribute to an irregular 3-dimensional density profile.
The traditional Archimedes method can only provide average densities, either in the entire compact or at best in sections of a compact. The part has to be cut into the respective pieces and then the average density of each piece is measured separately. This is often unsatisfactory because density variations are not revealed properly.
Dr Georg Schlieper of Gammatec Engineering presented an advanced method of measuring sectional densities of PM compacts. Gamma ray densitometry is a nondestructive test that needs no sample preparation and avoids the use of liquids. A beam of gamma radiation passes through the test part and the intensity of the radiation, which is partly absorbed by the material, and the material thickness are used to calculate the density. At first glance this may sound complicated, but this work is done by the computer. For the user it is a simple and quite straightforward measurement which can be widely automated.
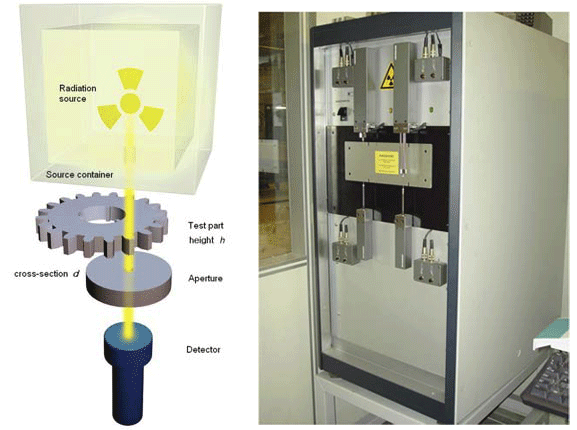
Fig. 4 Gamma ray densitometry: principle (left) and densitometer (right) used in the PM industry (courtesy Gammatec)
The principle of gamma ray densitometry is shown in Fig. 4. Gamma radiation is emitted by a radiation source in a shielding container. The beam leaving the container through a hole in the bottom passes through the test part and an aperture before it reaches the detector.
Each density measurement is associated with a measurement of the part thickness. This is carried out automatically by electronic feeler gauges attached to the front panel of the densitometer equipment. The parts are transferred into a chamber on an electrically driven table for the absorption measurement. Test parts are not affected by the radiation during the measurement and can subsequently be further processed.
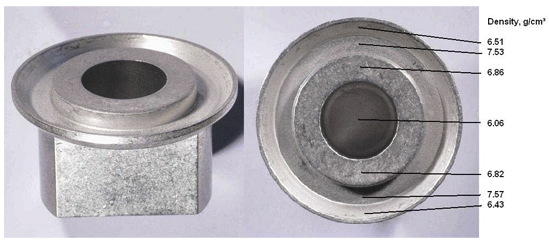
An example of sectional densities measured on a powder metal part is shown in Fig. 5. Due to its high complexity of shape and the thin rim it is a real challenge for PM parts producers and a uniform density, although desirable, is hard to achieve.
The results obtained with the densitometer show remarkable differences in the sectional densities. They range from 6.06 g/cm³ in the bottom to 7.57 g/cm³ in the rim. It is also remarkable that in the inclined part of the rim, directly adjacent to the highest density, it drops down to 6.43 g/cm³.
Although radiographic density measurement has been available for more than 20 years, many younger engineers do not seem to be aware of its existence. The presentation was an attempt to close the knowledge gap and provide an insight into the process.
News | Articles | Market reviews | Search directory | Subscribe to e-newsletter


