Euro PM2013: Innovation in crack detection on green PM compacts
The inspection of green PM compacts for cracks and other defects is a problem that has caused concern for many powder metallurgists for a long time. However, with new developments in X-ray radiography, there now appears to be a realistic chance for fundamental progress in this field.
Prototype equipment for crack inspection by digital radiography is currently under development in two European research projects in the FP7 program, AutoInspect and DiraGreen.
Results generated in the AutoInspect project were presented by three authors in Session 27 at Euro PM2013. A fourth presentation covered the acoustic resonance method for inspecting sintered PM parts.
PM parts fast in-line X-ray digital radiography
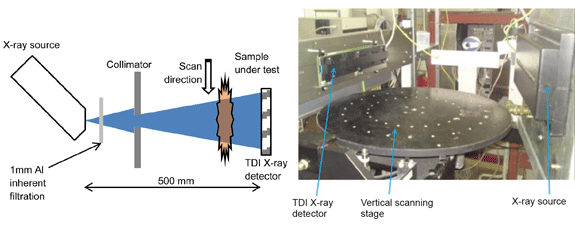
Technical details of the AutoInspect system were presented by Mihai Iovea of Accent Pro 2000 Ltd., Bucharest, Romania. The AutoInspect system includes an X-ray source with a minifocus of 0.8 x 1.2 mm spot size. An integrated Al filter serves to eliminate the soft radiation. The radiation beam is screened by a collimator and, after passing through the inspected part, registered by a linear Time Delay Integration (TDI) detector. This detector produces a continuous scanning video image of the part that is moved through the X-ray beam at constant speed. A two-dimensional image is then computed out of a stack of linear arrays (Fig. 1).
Production of ferrous PM parts for calibration and demonstration of typical defect detection performance of in-line X-ray digital radiography equipment
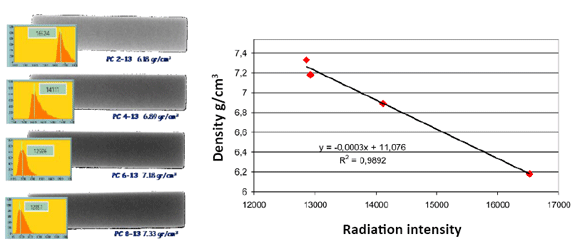
Christian Gierl-Mayer of the Technical University Vienna, Austria, presented a report on the preparation of samples with intentional density variations, cracks and defects for the calibration and demonstration of the capabilities of the new digital radiography equipment. Flat bars of constant thickness were pressed for calibration of the radiation intensity in correlation with the density. A linear correlation was found even without a correction for the sample thickness. (Fig. 2)
Several techniques were applied for creating internal defects, with coarse copper particles and pieces of copper wire being mixed into the powder and compacted. After sintering they left well-defined holes and cracks. Another method to produce defects was the simulation of cracks by inserting a foil into the die and the formation of cracks by double pressing and by pressing in a stepped die.
A defect detection and classification system for automatic analysis of digital radiography images of PM parts
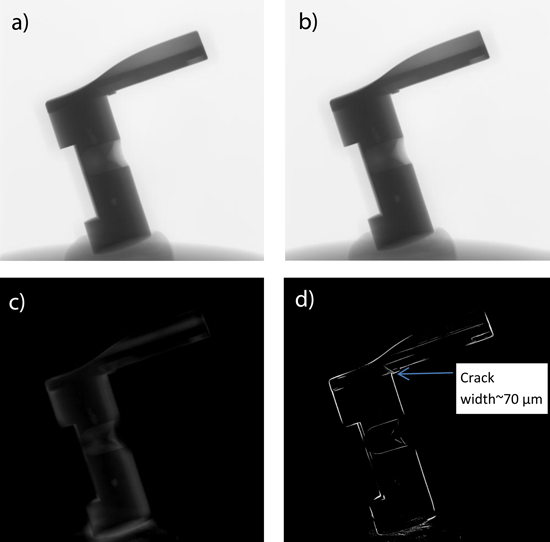
The automatic detection of cracks and flaws on X-ray images can be dramatically improved with suitable image processing algorithms, as Maxim G Ponomarev of Brunel Innovation Centre in Uxbridge, UK pointed out. He explained that original X-ray images are often blurred and flaws or cracks are difficult to detect with the naked eye and even more difficult with automatic image analysis. Then he demonstrated the effects of various image processing techniques on digital radiographic images and impressively confirmed how a crack in a green MIM compact became recognisable that was virtually invisible in the original picture (Fig. 3).
Constant quality assessment by acoustic resonance testing
The current status of acoustic resonance testing (ART) was reported by Michael Weidner of Medav GmbH in Germany. The principle of the test method is that the natural vibration modes of sintered PM parts are excited by an electrically driven hammer or other means. Then the resulting sound signal is recorded by a microphone, transformed in the frequency spectrum and the resonance frequencies are analysed automatically by a suitable computer software.
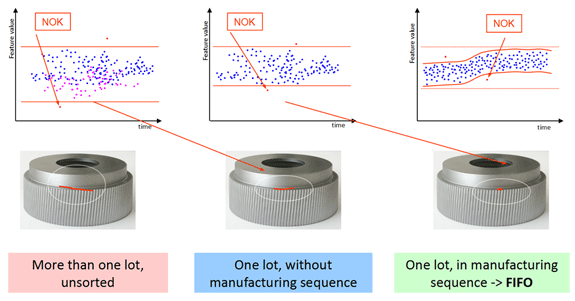
Much attention has been given to the development of better statistical procedures for the automatic adaptation of the scatter band of tolerated deviations from the average value. The author assumed that modern high volume manufacturing processes run in a stable manner with the vast majority of products being within specifications and only occasional outliers occurred. He presented a concept and discussed why only this kind of evaluation could reliably monitor the process. The concept included an algorithm that automatically derives a minimum and maximum allowable scatter band. The tolerated scatter band follows continuously the gradual variations that may occur in a long running manufacturing process (Fig. 4).
References
[1] Mihai Iovea, PM parts fast in-line X-ray digital radiography, as presented at Euro PM2013, Sweden
[2] Christian Gierl-Mayer, Production of ferrous PM-parts for calibration and demonstration of typical defect detection performance of in-line X-ray digital radiography equipment, as presented at Euro PM2013, Sweden
[3] Maxim G Ponomarev, A defect detection and classification system for automatic analysis of digital radiography images of Powder Metallurgy parts, as presented at Euro PM2013, Sweden
[4] Michael Weidner, Constant quality assessment by acoustic resonance testing, as presented at Euro PM2013, Sweden
Acknowledgements
Euro PM2013 was organised by the European Powder Metallurgy Associaiton. For more information please visit the EPMA website: www.epma.com
Author: Dr Georg Schlieper, Gammatec Engineering GmbH, Germany
Dr.-Ing. Georg Schlieper, physicist, received his PhD at the Insitute for Materials and Solid State Research of the University of Karlsruhe, Germany. He worked for 15 years in product and process development for the Powder Metallurgy industry where he focused on high strength sintered steels, heat treatment, surface technology, magnetic materials and metal injection moulding. Since 1994 he has worked independently as a consultant. Email: [email protected]
Download FREE PM Review magazine | News | Articles | Subscribe to e-newsletter


