Advancing Powder Metallurgy gears with new test rig
Gears in operation may eventually face fatigue problems related to pitting (gear flank failure) and/or tooth root fatigue.
Tooth root testing is typically conducted in a Vibrophore in which the gear is subjected to an increasing amount of stress cycles until it finally breaks. Pitting, the biggest challenge for PM so far, requires another piece of test equipment with the primary task of measuring the performance of the gear flanks. One such piece of equipment is the new FZG rig.
While able to test both spur gears and helical gears, the FZG rig is currently used to test modified standard C-PT gears. The modifications make the gears more accurate for the applications, and also enabled tooth root testing.
The gears have been designed in collaboration with VICURA and SwePart Transmission that manage gear design and manufacturing respectively. The primary material used for the gears is Astaloy® 85Mo but other materials such as Hipaloy®, Astaloy® LH and Astaloy® CrA are all suitable materials. The common denominator is that they are all case-hardened – a process required to reach maximum performance.
Gear testing procedure
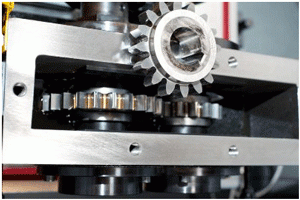
The new FZG test rig is about three times as big as the previously used test equipment designed by Senad Dizdar, a Höganäs employee. It contains two equal gear boxes of which one is the slave. In turn, each gear box contains two gears, one large and one small.
The engine turning the shafts is positioned on the far right side and on the opposite side two weights are attached. The weights represent certain loads and are replaced as the test procedure moves on to the next step – or “load stage”.
After the machine has been calibrated for each load stage, the shafts are locked and the weights are removed before starting the test. By using the torque sensor, it is possible to verify that the setting is correct thus enabling closer calibration of the machine.
The gears are tested at a temperature of about 80-90°C – the temperature at which gears typically operate. The test is normally run up to about 50,000,000 cycles with intermissions at certain intervals for examination of the gears.
“The testing procedure requires some manual investigation of the gear. Using a microscope we inspect the gears to see if any surface damage exists. If we find any indications of damage, the test is stopped. If we can’t reveal anything we carry on with the test.”
Providing gear pitting data to the industry is very important, but also a very time-consuming task. It takes up to 3 weeks to obtain one data point, and about 40 points are typically required. The goal is to provide material data and, in the long run, even suggestions to process routes for gear manufacturers.
“The performance of gears varies a lot so it is crucial to establish a comprehensive database in order for us to recommend the optimum material and process for the application. The goal is that, based on the test results we provide, gear box manufacturers should be able to design gears that match the requirements of their specific gear box”, states Andersson.
News | Articles | Market reviews | Search directory | Subscribe to e-newsletter


