2013 Hagen Symposium: Characterisation of the surface densification process on sintered gear components by numerical methods
Surface densification of sintered gears is an example of the potential that PM technology offers for the development of cost effective components with high strength and precision that can replace wrought gears. In Sandner’s presentation ‘Characterisation of the surface densification process on sintered components by numerical methods’ the reported development was based on Abaqus software which offers a great freedom for individual programming. Due to the specific properties of sintered materials, in particular the lack of constant volume, conventional computer simulation software cannot always be applied.
Definition of a suitable material model and determination of material parameters
Computer simulation of deformation processes for materials with a variable density requires a careful definition of the material model and reliable material parameters. The Gurson-Tvergaard model for material flow considers not only the total porosity, but also the pore shape and interaction between the pores. It requires the determination of the following parameters from compressive tests on cylindrical samples.
- Yield stress of the metal matrix as a function of the degree of deformation
- Yield stress of the porous material as a function of the degree of deformation
- Relative density as a function of the degree of deformation
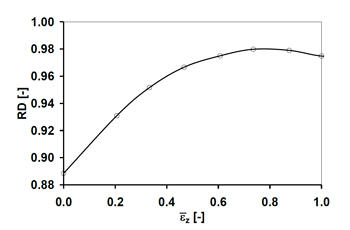
Fig. 1 Relative density (RD) of cylindrical samples as a function of the degree of deformation (courtesy Miba)
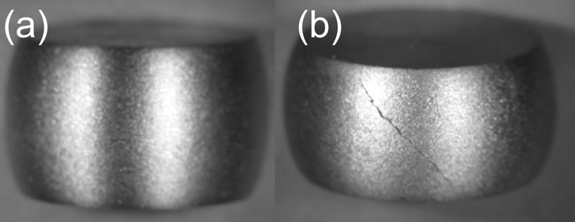
Fully dense cylindrical samples with a diameter of 10 mm and a height of 15 mm made from the gear steel were used to determine the properties of the metal matrix and samples with a relative density of 0.8884 were processed with degrees of deformation between 0.21 and 1. The relative density of porous samples is shown in Fig. 1 as a function of the degree of deformation. Fig. 2 shows the cylindrical samples after swaging. Above a deformation of 0.74 (i.e. 74%) the density fell off again and cracks were observed at the outer surface. Therefore the density at compressive deformations above 70% must be extrapolated.
Surface densification of sintered spur gears
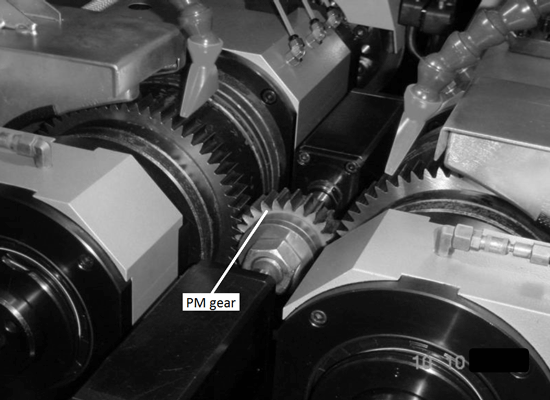
Fig. 3 shows the gear rolling machine with the PM spur gear between two rolling tools. When the PM gear has been positioned and the rolling tools are in the starting position, the rolling process starts by reducing the axial distance at first gradually (centering), then faster (densifying) and finally it is kept constant (sizing).
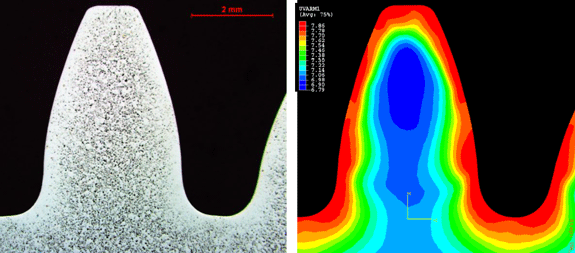
Sandner reported that this process had been simulated with certain assumptions which were necessary to simplify the calculation. The gear characteristics of a spur gear were: 41 teeth; module 1.75; pressure angle 17°; tooth width 8 mm. The simulated and metallographically determined density distribution is shown in Fig. 4. Metallographic and computed density figures match closely. This is evidence for an appropriate computer simulation.
Practical experience
While spur gears with rolled tooth flanks are state-of-the-art today, helical gears are still under development. For the first time, computer simulation was applied to a helical gear with these characteristics: 44 teeth; module 1.35; pressure angle 15°; helix angle 25°; tooth width 14 mm; high toothing. Since the gear was designed for a grinding finish after case hardening, the densified region had to be well developed in order to provide an allowance for the material removed by grinding.
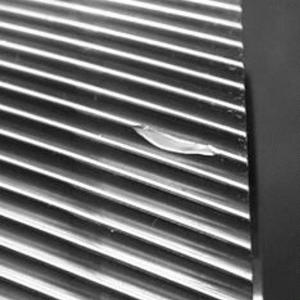
The gear profiles of the sintered part and the rolling tool were designed as usual based on a cut parallel to the end faces and a satisfactory surface densification by rolling was predicted by computer simulation. Rolling tools were manufactured, first samples produced and successfully tested. When volume production started, a tooth of the rolling tool broke after less than 1000 rolled gears (Fig. 5). At first a material defect was assumed, but after repeated tool failures the process was analysed in detail.
Soon it was recognised that the tooth profiles that are relevant for the rolling process are not the ones of the end face cut, but those of the normal cut, i.e. perpendicular to the tooth flank. It is obvious that in this cut the teeth of both the sintered gear and the rolling tool appear significantly thinner than in the end face cut.
A computer simulation based on the normal cut and with consideration of the elasticity of the rolling tools revealed that bending stresses at the rolling tool could increase up to 2000 MPa. By variation of geometrical and process related parameters in the computer simulation it was possible to significantly decrease the maximum bending stresses and thus achieve significantly improved tool lifetimes. To come to the same result by experimental process variation would have been so expensive and time consuming that the PM solution would have been abandoned, added Sandner.
Sandner concluded his presentation with the statement that in modern process development anything that is done in reality should be accompanied by computer simulation. Thereby a better understanding of the processes is acquired and this in turn helps to develop new, improved and stable processes in short times at affordable costs.
Author: Dr Georg Schlieper, Gammatec Engineering GmbH, Germany
Dr.-Ing. Georg Schlieper, physicist, received his PhD at the Insitute for Materials and Solid State Research of the University of Karlsruhe, Germany. He worked for 15 years in product and process development for the Powder Metallurgy industry where he focused on high strength sintered steels, heat treatment, surface technology, magnetic materials and metal injection moulding. Since 1994 he has worked independently as a consultant. Email: [email protected]
Download FREE PM Review magazine | News | Articles | Subscribe to e-newsletter


