Alicona to display range of cutting tool measuring technologies at MACH show
February 26, 2016
Alicona, headquartered in Graz, Austria, has announced it will display its new range of cutting tool measuring technologies for the first time in the UK at MACH 2016, April 11-15, Birmingham, UK.
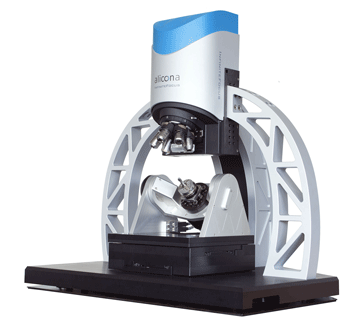
Alcona’s high resolution optical 3D metrology sensor head, combined with a six-axis, automatic or manual robot, provides users a with a flexible measurement solution for quality assurance applications. The 3D measurement sensor is ideal for production or defect inspection applications: it is resistant to vibration, ambient light and temperature variation in addition to being quick and easily integrated in existing systems.
With two different application possibilities, the 3D sensor can be easily optimised for inclusion in the process line. One option allows for the sensor to be mounted on a robot enabling it to approach various work pieces. Another option is manually moving the sensor head to the feature to be measured.
This fully integrated 3D metrology in production saves time and allows quality assurance to be included as an integral part of the manufacturing process. Using this technology, users are provided with important real-time information on the state the manufacturing process in addition to the product. This is made possible through the rapid display of reliable measurement data, especially in industrial manufacturing. In just one measurement cycle, it is possible to measure and analyse at various positions.
A traffic light system immediately reports whether or not work pieces are within geometrical tolerances, enabling the early recognition of defective processes. In addition, a simple teaching functionality allows simple configuration of customised measuring sequences.
The measurement process can be successfully implemented into different industries for inline measurement of critical surfaces. For example, in the tool industry the robot is used for verification of all cutting edges in only one measurement cycle. Numerous edge parameters including: radius, angle, form deviation, flash or diameter are measurable.
Another area of application is the quality assurance for entire batches. This is made possible by analysing a single parameter on several work pieces in one measurement cycle. With this high degree of automation, the need for manual intervention after starting a measurement is eliminated retooling times are reduced.
It is especially useful to measure small features on large items such as discs, and turbine blades and also for measuring critical defects in larger objects. All measurements are taken on an accurate 3D model of the surface, allowing the measurement position to be identified and placed according to requirements. This 3D model is saved in a database providing a quality assurance record.
Optical measurements provided by Alicona are produced quickly and intuitively, all surface features and finish are controlled by the intuitive user interface allowing measurement parameters to be set automatically. The instruments are almost maintenance-free, easy to install and do not require a controlled environments to operate, all measurements are traceable to internationally recognized standards and can be used in a production environment or in machine for closed loop manufacturing.


